

Why the Right Bolted Coupler Makes or Breaks Your Rebar Connection
A bolted coupler is a mechanical splice that joins two reinforcing bars end-to-end using a steel sleeve and internal shear bolts — no threading, welding, or lap length required.
Quick answer — top reasons contractors choose bolted couplers:
- No rebar end prep — insert the bar and tighten the bolts
- Works where space is tight — ideal when one bar is already cast in place
- Visual confirmation — shear bolt heads snap off when correct torque is reached
- Code-compliant — meets ACI 318 Type 1 and Type 2 splice requirements
- Wide size range — available from 10 mm to 57 mm (ASTM #4 to #18)
Connecting rebar on a busy job site sounds simple. In practice, it rarely is. Lap splices eat up extra steel and require enough clear space to overlap bars properly. Welded connections demand certified welders, heat control, and time you don’t have. When neither option works — because a bar is already cast, the congestion is too tight, or the schedule is too short — contractors need a better answer.
That’s exactly where bolted couplers earn their place on the job site.
I’m Jordan Harris, a licensed structural engineer and product developer at T.J. Harris Company, and my background in large-scale concrete construction has given me a front-row seat to how the right bolted coupler can save a pour — and how the wrong one can slow everything down. In this roundup, I’ll cut through the noise so you can find the best option for your next project.
What is a Bolted Coupler and How Does It Work?
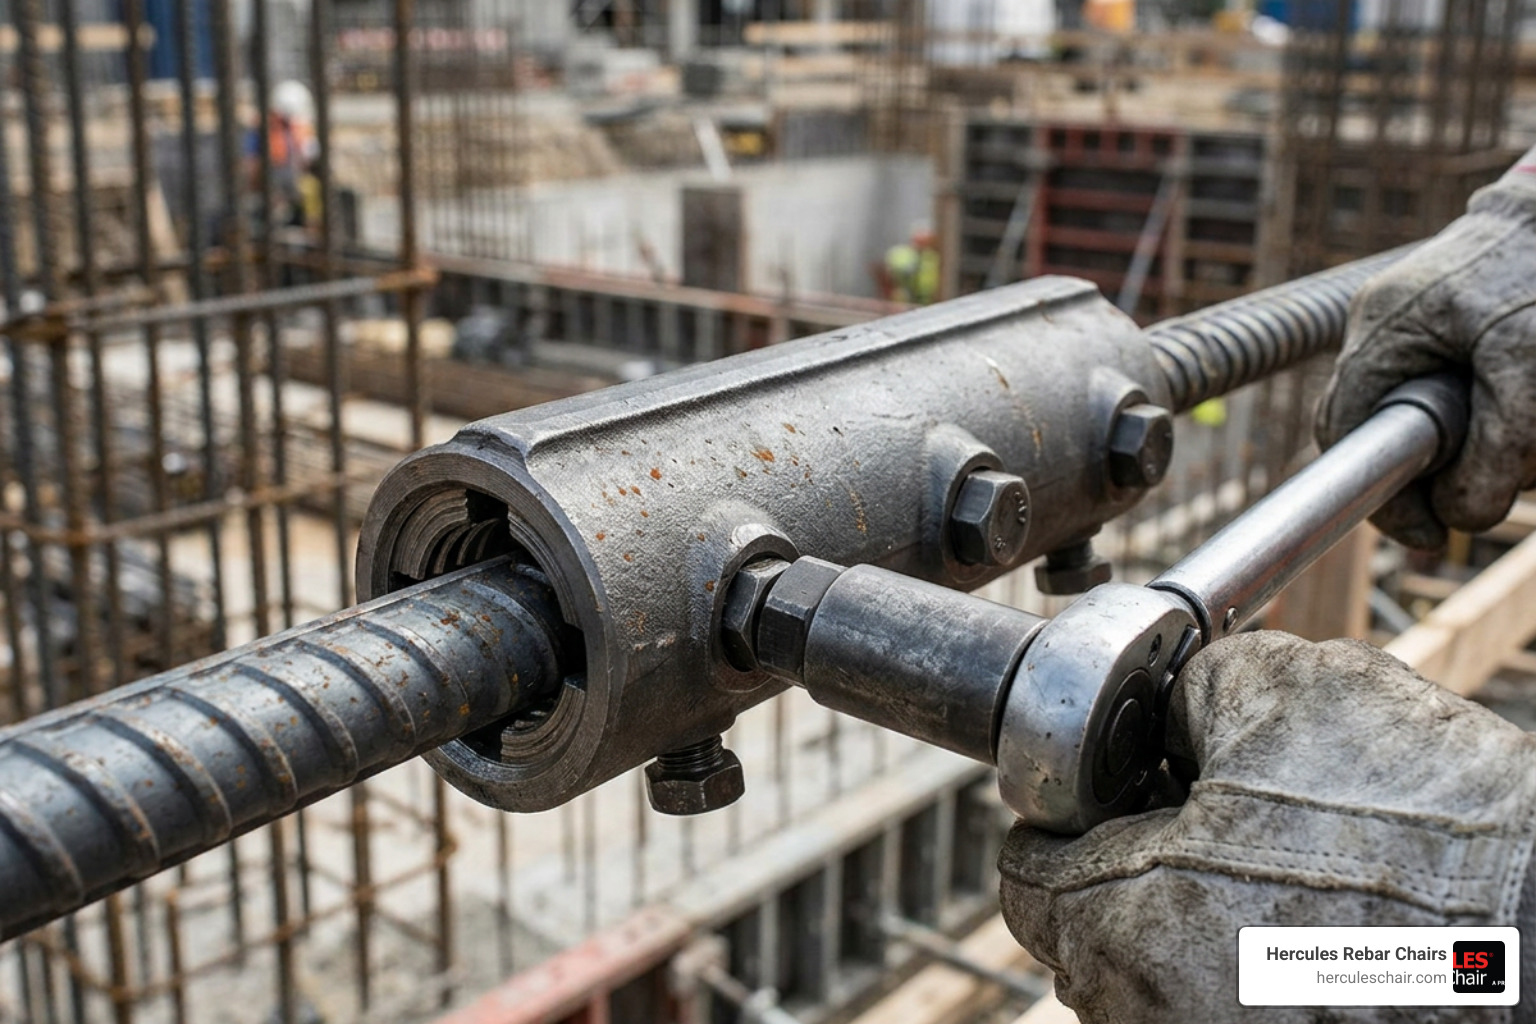
At its core, a bolted coupler (often referred to as an MBT coupler) is a high-strength steel sleeve equipped with two rows of specialized lock-shear bolts. Inside the sleeve, there are hardened, serrated grip rails designed to bite directly into the reinforcing steel.
The mechanism is beautifully simple:
- You slide the ends of two reinforcing bars into opposite sides of the coupler.
- You tighten the shear bolts using a standard hand wrench or an impact wrench.
- As the bolts tighten, they force the rebar down against the internal grip rails.
- Once the bolt reaches its pre-engineered torque limit, the head of the bolt shears off cleanly.
This leaving-behind of the sheared bolt head provides an instant, error-proof visual confirmation that the connection has achieved its full mechanical grip. There is no need for specialized torque wrenches or inspection gauges on-site. Because this system relies entirely on mechanical clamping, it completely bypasses the need for threading, hydraulic crimping, or welding.
If you want to see how these compare to other mechanical splicing options on the market, take a look at our guide on Splicing Made Simple with These Top-Rated Rebar Couplers.
Key Differences Between a Bolted Coupler and Traditional Splices
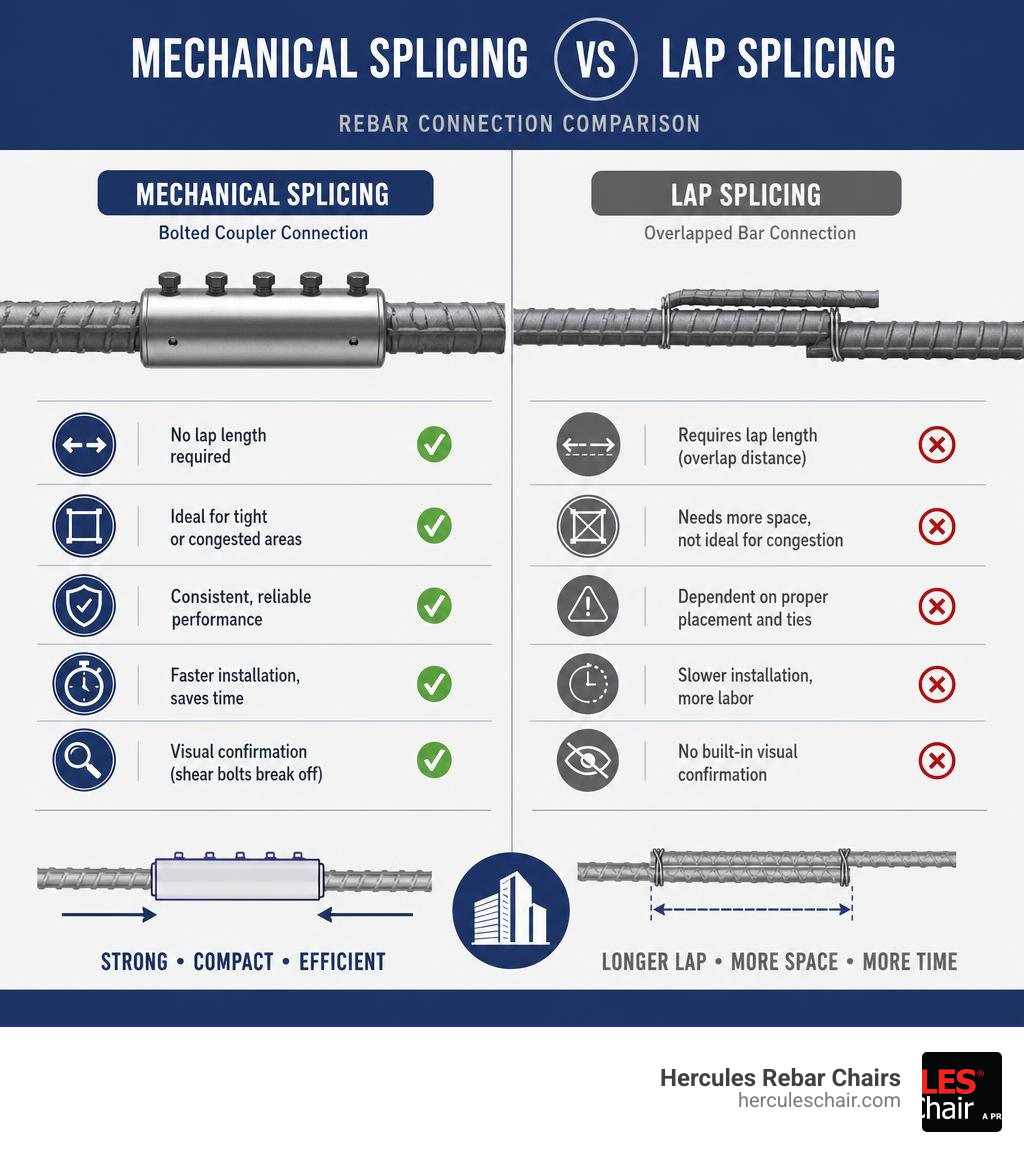
To appreciate why a bolted coupler is such a game-changer, it helps to compare it to the two traditional methods of joining rebar: lap splicing and welding.
- Lap Splicing: This traditional method relies on overlapping two parallel bars over a specified “lap length” so that the surrounding concrete can transfer the load from one bar to the other. In heavy structural elements, lap lengths can easily exceed 4 to 5 feet, wasting massive amounts of expensive steel. Worse, overlapping twice the amount of steel in one area leads to severe bar congestion, making it incredibly difficult for concrete to flow smoothly around the bars.
- Welded Connections: Welding provides a high-strength, continuous connection but comes with steep labor costs. It requires certified structural welders, strict weather conditions, and precise heat control to avoid damaging the metallurgical properties of high-strength TMT or reinforcing bars.
- The Bolted Coupler Alternative: A bolted coupler provides a direct end-to-end connection that behaves like a continuous piece of steel. It eliminates the waste of overlapping steel, reduces bar congestion to improve concrete flow, and requires no specialized labor. It is the ultimate problem-solver when one rebar is already cast in place and there is simply no physical space to perform a hydraulic cold-press crimp or fit a massive lap length.
To dive deeper into how these different mechanical systems stack up, check out The Contractor’s Guide to Rebar Couplers and Sleeves.
Technical Specifications, Dimensions, and Performance Standards
When you are designing concrete structures in 2026, compliance is everything. To be accepted in structural applications across the United States, a bolted coupler must satisfy rigorous performance standards.
Most notably, these systems are engineered to meet ACI 318 Type 2 splice requirements. A Type 2 mechanical splice is designed to develop the full specified tensile strength of the spliced bar, which is essential in high-seismic zones where plastic deformation is expected.
To give you an idea of the physical dimensions and structural capacities of these systems, here is a breakdown of typical specifications across standard rebar sizes:
| Rebar Diameter (Metric / US) | Outer Diameter of Coupler | Coupler Length | Number of Shear Bolts | Approximate Unit Weight |
|---|---|---|---|---|
| 12 mm (#4) | 33.5 mm (1.32 in) | 140 mm (5.5 in) | 6 | 0.72 kg (1.6 lbs) |
| 16 mm (#5) | 41.3 mm (1.63 in) | 190 mm (7.5 in) | 8 | 1.30 kg (2.9 lbs) |
| 25 mm (#8) | 54.0 mm (2.13 in) | 270 mm (10.6 in) | 10 | 3.50 kg (7.7 lbs) |
| 32 mm (#10) | 65.0 mm (2.56 in) | 350 mm (13.8 in) | 12 | 6.80 kg (15.0 lbs) |
| 40 mm (#12) | 81.0 mm (3.19 in) | 485 mm (19.1 in) | 14 | 11.50 kg (25.4 lbs) |
Performance Criteria and Testing
To earn their structural certifications, bolted couplers must undergo exhaustive testing:
- Static Tensile Strength: The joint must withstand forces exceeding 125% to 135% of the rebar’s minimum yield stress ($f_y$). For instance, standard couplers achieve a tensile strength of 600 N/mm² to ensure the bar itself fails before the coupler does.
- Slip Testing: Under load, the rebar must not slide inside the sleeve. The total slip for a spliced sample must be less than 0.10 mm to maintain structural stiffness.
- Fatigue Testing: For high-fatigue environments (such as bridges or transit systems), mechanical splices must withstand 20 Lakh (2,000,000) cycles of alternating tension and compression in high-cycle fatigue tests, and 10,000 cycles in low-cycle fatigue tests.
- Tall Structure Resilience: The joint must withstand 100 cycles of extreme stress variation to simulate the intense dynamic loading experienced by tall skyscrapers and stack-like structures.
To ensure quality control on the job site, top-tier manufacturers implement traceability measures such as laser-etching a Unique Identification Number (UIN) on every single coupler. This allows structural inspectors to trace the exact steel batch, manufacturing date, and testing records for every splice on a project.
While reinforcing steel is our primary focus in concrete construction, it is worth noting that parallel bolt couplers are also highly utilized to bridge the gap between rebar and threaded structural bolts. Products like the S4 Imperial UNC Parallel Bolt Coupler, Plain and the S13 Metric Parallel Bolt Coupler, Plain, Worldwide Design provide structural continuity between reinforcing steel and imperial or metric all-thread rods.
This mechanical concept differs significantly from industrial shaft connections. For example, the heavy-duty machinery systems described in the academic study Integrated Design of Hydraulic Coupling Bolts for Large Shaft Systems rely on hydraulic pressure to expand a sleeve radially into a flange hole. In contrast, rebar couplers use direct mechanical bite via shear bolts to lock the steel in place.
For a comprehensive look at how mechanical couplers compare to threaded alternatives, read our guide on Threaded Rebar Couplers and Why They Are the Industry Standard.
Sizing Options for Every Bolted Coupler Application
Whether you are working on a light commercial foundation or a massive civil infrastructure project, there is a bolted coupler sized for your needs.
For smaller, everyday tasks, solutions like the nVent LENTON Connect B22 Series Shear Bolt Coupler, Plain, 12mm, 16 mm | nVent LENTON are perfect for #4 and #5 US rebar sizes. When you step up to heavier structural columns, beams, or bridge piers, larger options like the nVent LENTON Connect S2 Series Shear Bolt Coupler, Plain, 25 mm provide the robust clamping force needed for #8 bars and above.
Transition couplers are also widely available, allowing you to seamlessly connect rebars of different diameters (such as splicing a #8 bar to a #10 bar) without needing to transition through a threaded step.
For more details on choosing the right mechanical connection for your project, check out Splice It Right: Your Handbook to Mechanical Lap and Dowel Bar Splicers.
Step-by-Step Installation and Torque Requirements
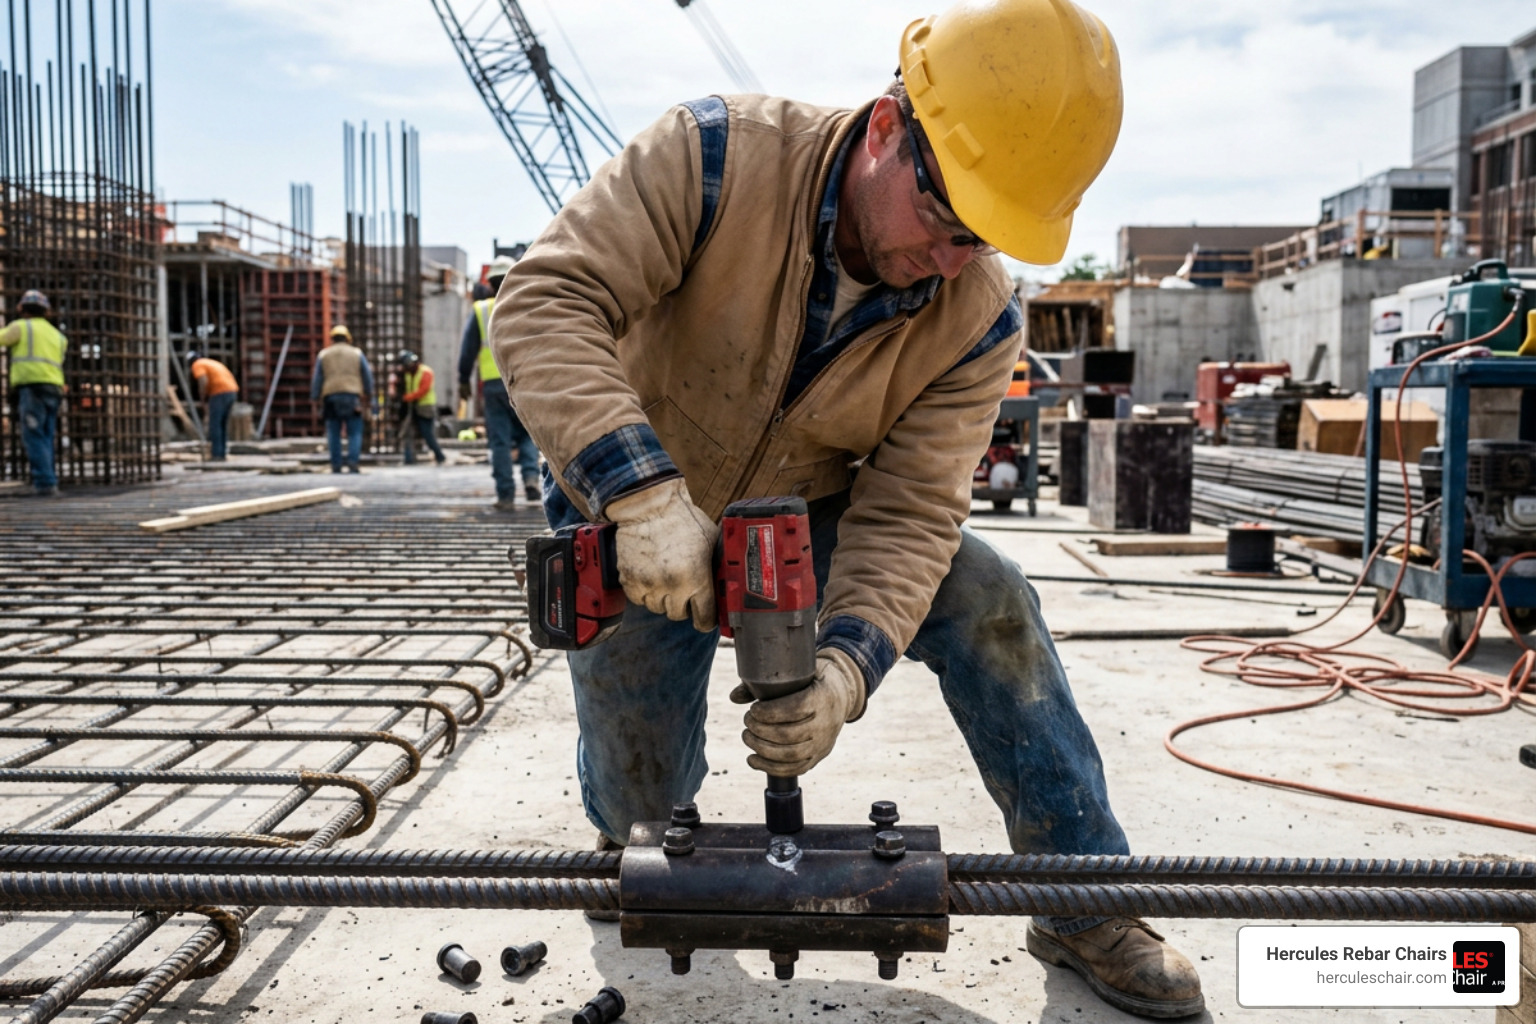
One of the greatest operational benefits of a bolted coupler is how easy it is to install. It requires no specialized training or heavy machinery. Here is the step-by-step process we recommend on-site:
- Clean the Rebar Ends: Ensure the ends of the two reinforcing bars are relatively clean and free of heavy mud, loose rust, or concrete splatter. Unlike threaded systems, there is no need for precise square-sawing or end-threading.
- Mark the Embedment Depth: Measure half the length of the coupler sleeve and make a quick chalk mark on the end of each rebar. This ensures you insert the bars fully to the center of the coupler.
- Position the Coupler: Slide the coupler over the first bar until it meets the internal centering pin. (Note: For closure pours or retrofit applications where you need to slide the coupler entirely out of the way, you can easily remove the centering pin to allow the sleeve to slide fully onto one bar, then slide it back over the joint).
- Insert the Second Bar: Insert the second reinforcing bar into the opposite end of the sleeve until it butts up against the first bar or the centering pin.
- Tighten the Shear Bolts: Using a standard impact wrench or a pneumatic wrench, begin tightening the bolts. Always start from the center of the coupler and work your way outward to the ends. This prevents the rebar from bowing or shifting during installation.
- Shear the Bolt Heads: Continue tightening each bolt. Once the pre-determined torque value is reached, the hex head of the shear bolt will snap off cleanly.
- Visual Inspection: Walk the joint. If all the hex heads have sheared off, your inspection is complete. It is that simple.
For those interested in the deep engineering principles behind how bolted joints behave under tension, relaxation, and shear, the Guide to Design Criteria for Bolted and Riveted Joints Second Edition is an excellent resource on the physics of high-strength structural bolting.
Frequently Asked Questions about Bolted Couplers
What are the main advantages of using a bolted coupler in concrete construction?
The primary advantages are speed, space savings, and simplicity. They completely eliminate the need for costly and time-consuming rebar end preparation (like threading or crimping). Because they create a compact end-to-end joint, they resolve severe bar congestion, allowing concrete to flow freely through the steel reinforcement cage. This reduces the risk of structural voids and honeycombing. Finally, they require no specialized labor or heavy equipment, saving significant money on site.
Do bolted couplers require special rebar end preparation?
No. Unlike threaded couplers which require the bar ends to be saw-cut square and threaded with a specialized machine, bolted couplers can be installed on standard, field-cut rebar. The internal grip rails and high-strength shear bolts are designed to bite directly into the standard deformations of the rebar, saving hours of prep time.
How do you verify that a shear bolt coupler is properly tightened?
Verification is entirely visual. The specialized bolts are engineered with a weakened neck that shears off precisely when the correct torque is reached. Once all the bolt heads have snapped off, leaving a flush surface along the coupler body, the joint is fully tightened and ready for structural inspection.
Conclusion
At Hercules Rebar Chairs, we are passionate about building strong, code-compliant concrete structures that stand the test of time. While we are proud to be America’s #1 manufacturer of heavy-duty concrete supports — with over 14 million of our signature red rebar chairs sold to save contractors time and money — we know that a truly robust concrete pour relies on every component working in perfect harmony.
Choosing a high-quality bolted coupler ensures that your steel reinforcement behaves as a continuous, high-strength skeleton, capable of handling the most demanding structural and seismic loads. By eliminating tedious bar preparation, reducing material waste, and streamlining the inspection process, bolted couplers are a smart investment for any modern job site.
Ready to master your next concrete reinforcement project? Explore our comprehensive guide, Rebar Couplers: Your Ultimate Guide to Connecting Steel Strong, to learn more about selecting the perfect splicing systems for your builds.